802.1X Enterprise Wi-Fi Authentication: What Mac Admins Need to Know
 Steven Vogt
Most people—even some admins—don’t think twice about logging into the office Wi-Fi network. Typically, they just supply a username and password, their Apple devices log in, and they never think about what just happened.
But there’s a lot going on under the hood to make that authentication work. There are a bewildering variety of authentication protocols—each with its own acronym, of course—enabling enterprise Wi-Fi. As someone who manages Apple devices in the enterprise, it’s typically up to you to make sure those wireless connections happen. So here’s what you need to know about enterprise authentication and how it works.
How Personal Wi-Fi Authentication Works
When you attempt to use a Wi-Fi network, it will typically require you to authenticate—meaning you’ll be required to prove that you’re properly authorized to gain access.
Of course, some Wi-Fi networks don’t use any authentication at all; they’re open. You click on the name of the network in a Wi-Fi drop-down and you’re connected. For example: You’re in a hotel, click on the name of its Wi-Fi network, and you're on. You might be prompted for some information on a captive portal—your name, a room number, maybe even a set of credentials that they provided at the front desk. But the network is essentially open.
But in business and enterprise environments such open networks are the exceptions. More commonly, you’ll need to authenticate before the network will let you on. Wi-Fi authentication schemes fall into two broad categories: personal and enterprise.
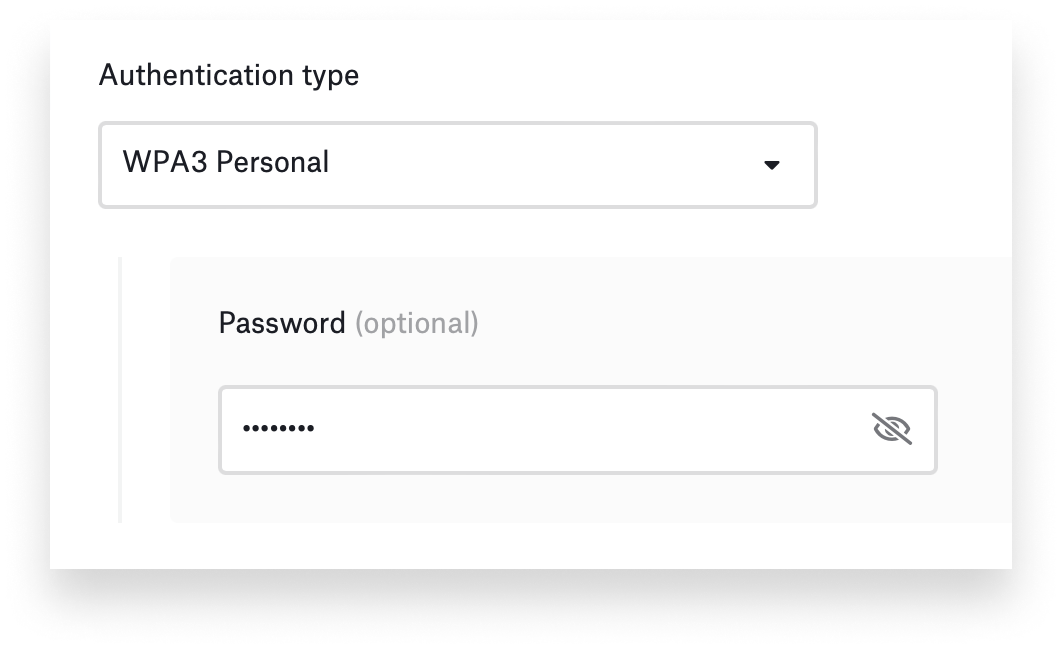
Personal authentication, which your home Wi-Fi network likely uses, is relatively simple: You have a device and a network access point. (More modern systems might have multiple access points, but the concept is the same). When you try to get on that network, you're prompted for a pre-shared key (fancy lingo for a password). If what you enter matches the key that the access point is looking for, you get access. Those pre-shared keys are the same for all devices.
While personal authentication systems are simple to administer, they’re a problem in a business environment. Imagine that all employees can access the company network using the same key. If an employee leaves and has that key, he can still get access to the network. He could sit out in the parking lot and join the network, potentially putting company data at risk.
As an admin, you might think, "OK, I'll just change the key." But if you do that, any devices using the old key will be disconnected. You’d need first deploy the new key to the remaining users. This is obviously impractical in a business environment: Imagine trying to change this pre-shared key across a thousand devices—it’d be a huge hassle.
How 802.1X Wi-Fi Authentication Works
That's where enterprise Wi-Fi enters the picture. There's one main standard for it: IEEE 802.1X. That standard, in turn, has been implemented in several different ways: WPA Enterprise, WPA2 Enterprise, WPA3 Enterprise, and others.
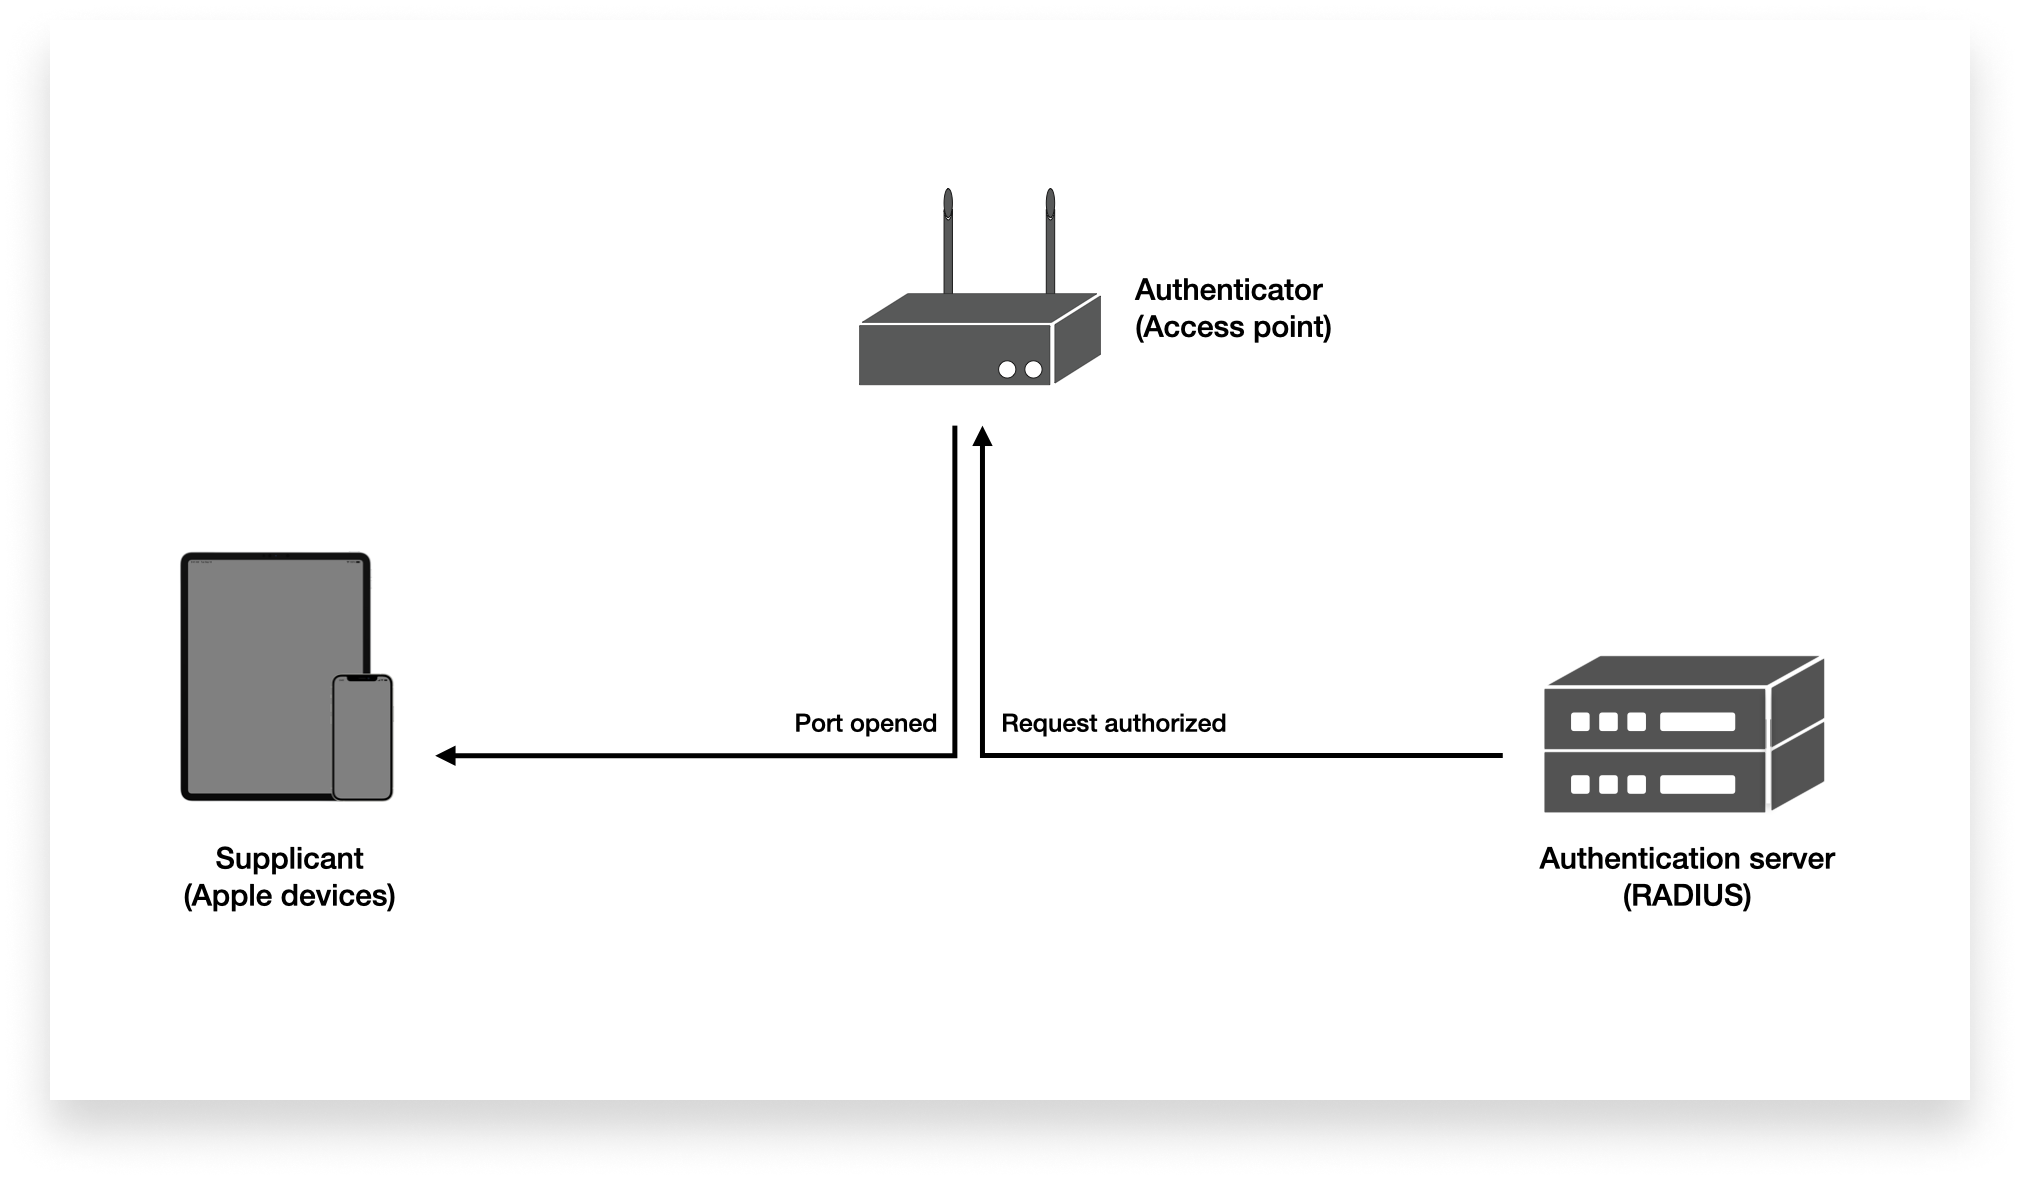
802.1X uses something called the Extensible Authentication Protocol (EAP) to authenticate users. That protocol is based on mutual authentication. That means that (a) the device must trust the network it is joining and (b) the network must trust the device or person trying to join. To build that mutual trust, the system needs three components.
The first is a device—the official term is “supplicant”—which could be a Mac, iPhone, iPad, or Apple TV.
The second is an authentication server. There are different flavors of those, but the most common is known as RADIUS. (That stands for Remote Authentication Dial-In User Service; it was originally designed to authenticate users who were dialing into a server.)
Third, you need an authenticator or access point. In a bigger network, a variety of access points could be acting as your authenticators and you could have a controller acting as the brain of the operation.
Metaphorically, you can think of the device as someone driving a car and the authenticator as a traffic cop who will allow the driver to proceed onto the network or not. The driver has to prove they’re authorized to drive and the cop has to accept that proof.
When a device tries to connect to the network, it is initially barred by the authenticator. The authenticator prompts the device for evidence that it should be given access. The device sends that evidence, the authenticator checks it with the authentication server, and if it checks out, the request gets authorized, and the device is on the network.
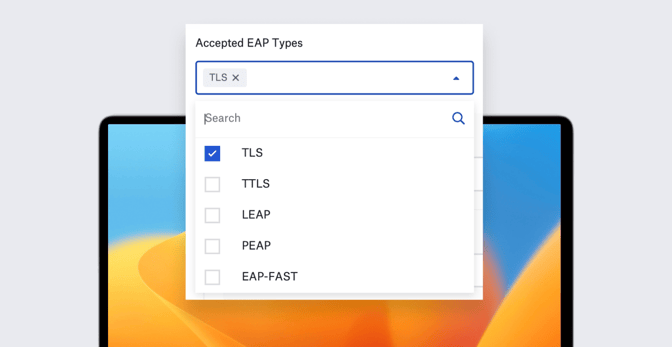
There are many different variations of EAP, but they generally fall into two big buckets: Those based on usernames and passwords and those based on identity certificates. (Some protocols rely on other factors. EAP-SIM, for example, might use your iPhone’s SIM card to authenticate to a network.)
PEAP, TTLS, and EAP-FAST, for example, use a username and password. Ideally, all the usernames and passwords in a given network or organization are unique. (Some companies actually do use the same username and password for every device—but that’s no better than using a pre-shared key.) Usually, those credentials are checked against a directory service, with the authentication server as an intermediary.
TLS, on the other hand, uses identity certificates to authenticate users or devices. In the metaphor we’ve been using, this is the equivalent of handing an official driver's license to the traffic cop. They'll look at it but won’t take your word that it’s valid. Rather, they’ll check it against a registry—in this case, a certificate authority.
How Users Get 802.1X Authentication Credentials
In many companies, a username is given to the user. That user is then able to set a password with the organization’s local or cloud-based directory service.
Getting an identity certificate is a little more complicated. Simple Certificate Enrollment Protocol (SCEP) and Active Directory Certificate Services (AD CS) are two common ways to get such identity certificates to devices. In the context of device management, an MDM solution doesn’t usually deliver an identity certificate to the device itself—instead, it provides instructions on how the device should obtain it. (You could manually deliver identity certificates, but that isn’t very scalable if want to give each user or device a unique one.)
Let’s use SCEP as an example. In Kandji’s case, it delivers a SCEP payload that tells the device to create a key pair and then to send a certificate-signing request to the SCEP server designated in that payload. The SCEP server acts as a kind of intermediate layer, allowing the device to request an identity from the certificate authority. If everything checks out, that authority will return an identity certificate to the device. In our metaphor, it’s like providing a set of instructions: “Here’s how you get to the department of motor vehicles. Here's where you get your license. Here's a special access code that you need to get it. And this is the information you want on it."
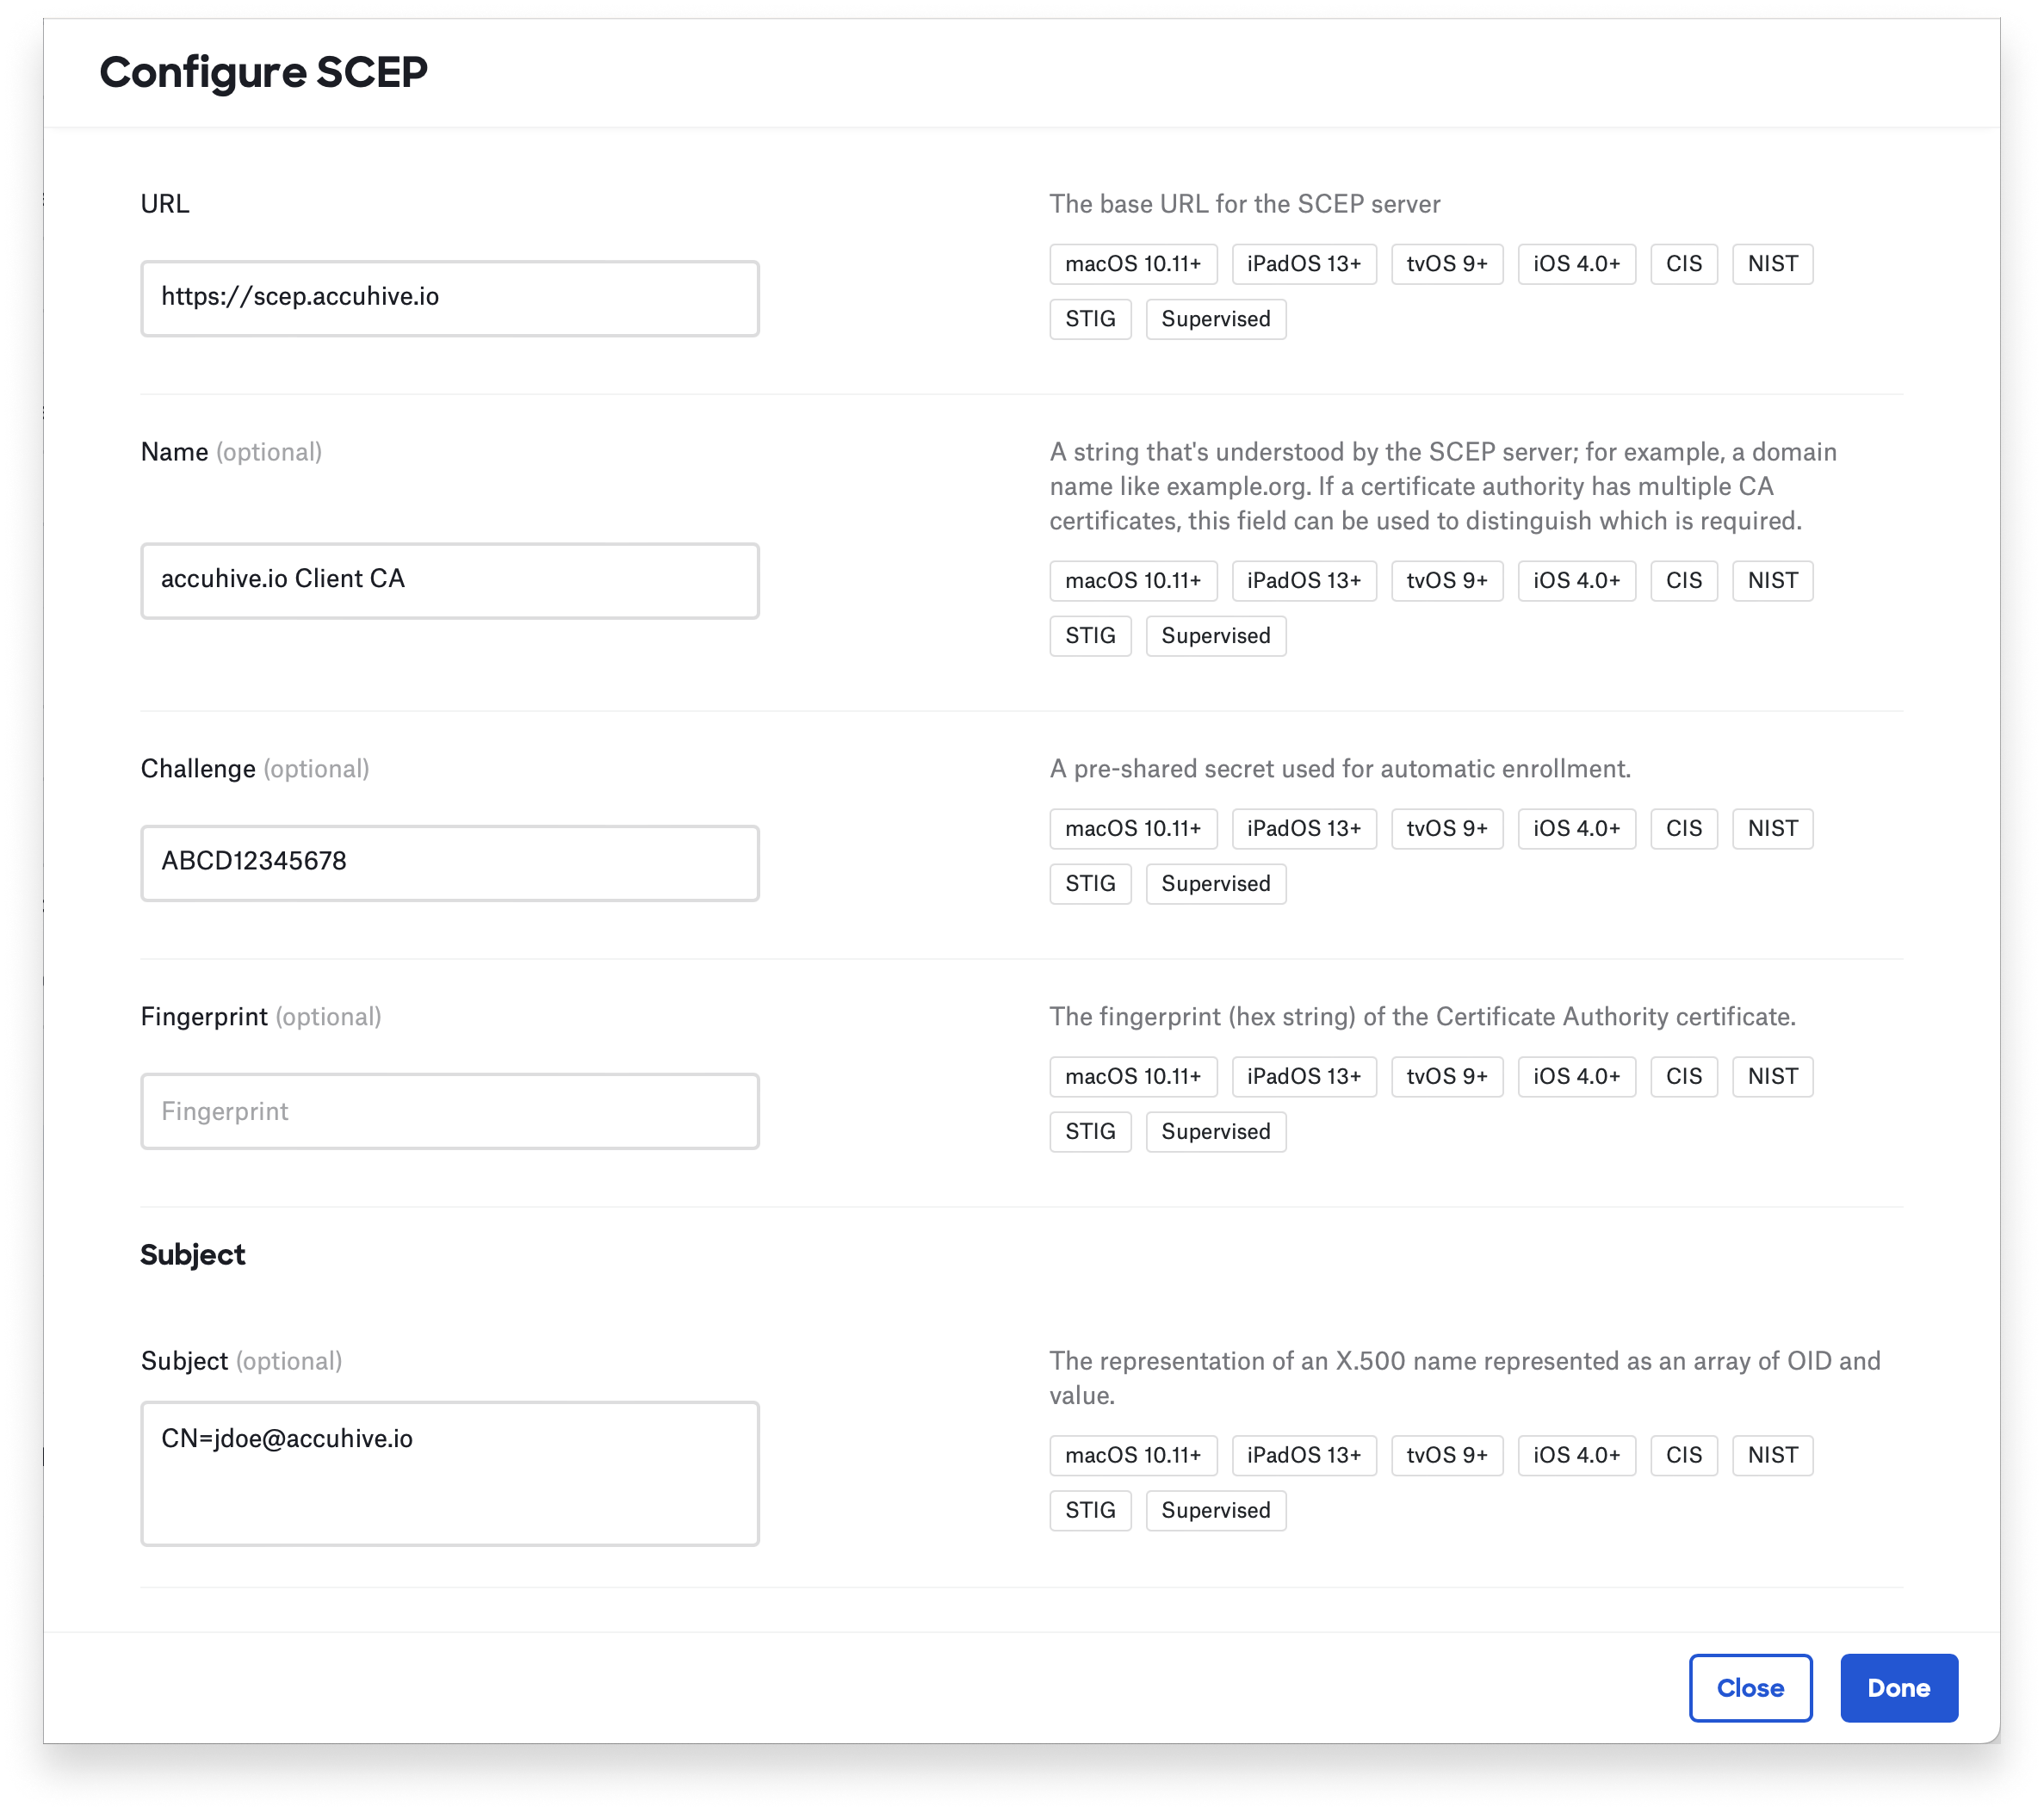
Once all that happens, an identity certificate is added to the keychain, and the device can use that identity certificate to authenticate on the Wi-Fi network. There are a few more technical details behind the scenes, and AD CS works differently, but key point is that the device uses a service to obtain an identity certificate. This provides a scalable solution for enterprises wanting to distribute such identity certificates.
Some companies choose to require both an identity certificate and a username-plus-password. Most commonly, the identity certificate is used to verify the device, and the username and password to verify the user. This can increase security and provide more personalized services to the user, but also greatly increases complexity.
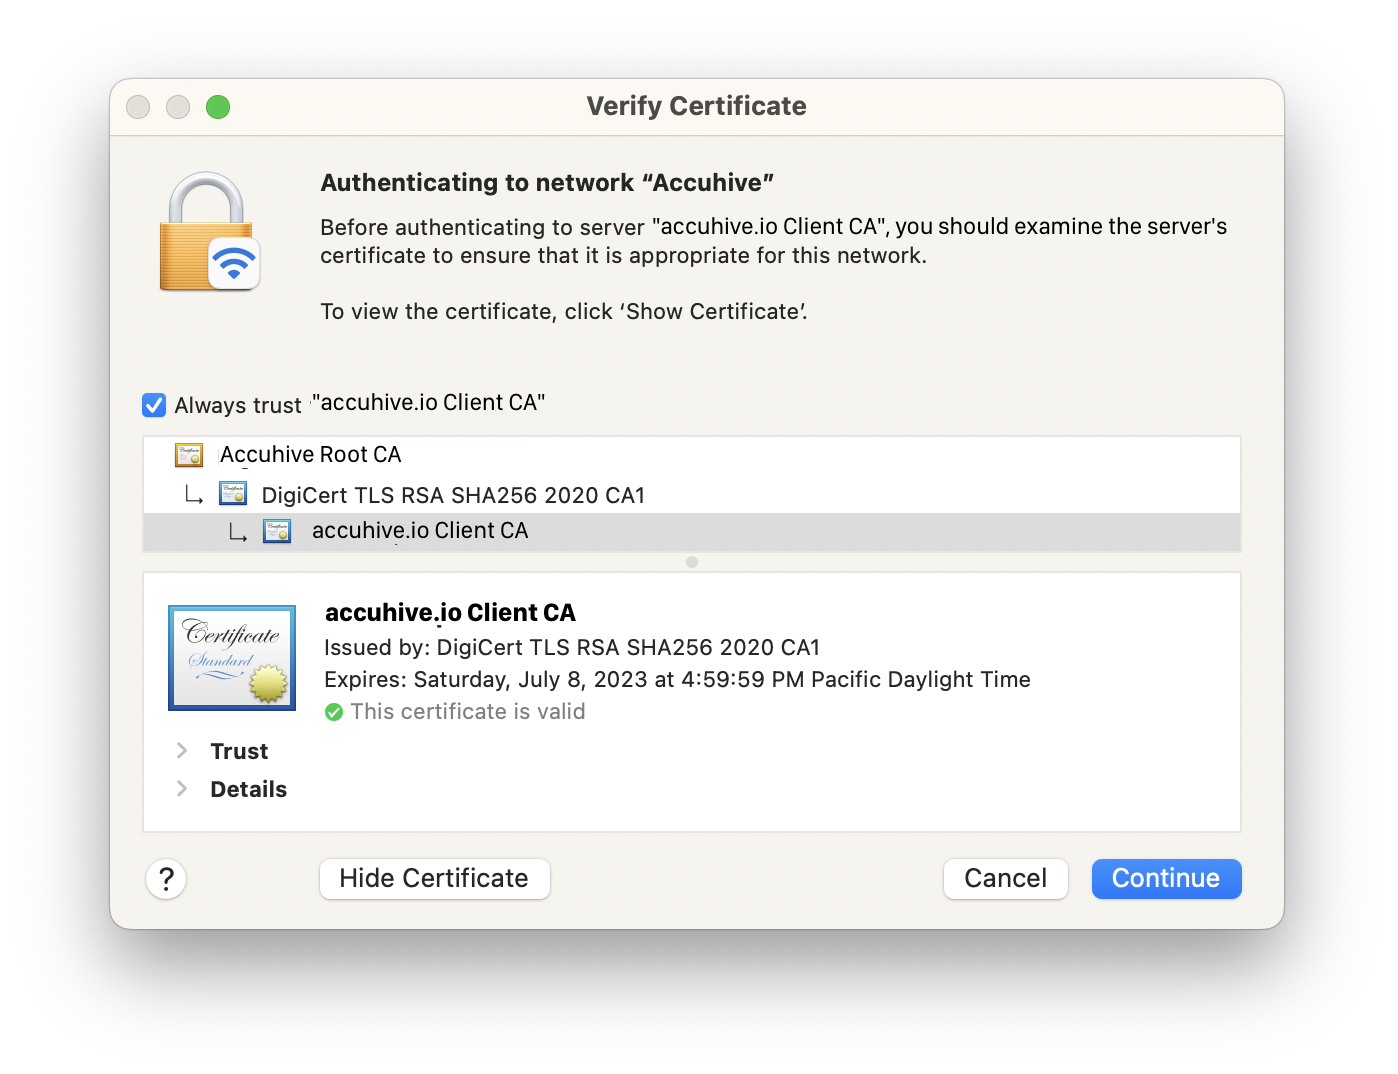
Whatever credentials a user or device is presenting to authenticate, the EAP protocol requires that the device also trust the authentication server. The authentication server needs to prove it is what it says it is, and it does so by presenting its server certificate to the device. If the device decides it can trust that authentication server, it will send its credentials back and get authenticated (if the credentials match) or not (if they don’t). In our metaphor, this is like the state trooper showing you his badge before you hand over your license.
You see such server certificates every day when you navigate to secure websites. For example, if you navigate to your bank’s website, your browser indicates that it’s using a secure connection—unless it detects something wrong with the certificate. If that happens, your browser will indicate that your bank’s website cannot be trusted.
Managing 802.1X Wi-Fi with MDM
Unfortunately, when it comes to 802.1X Wi-Fi there’s a lot that can go wrong. Simply put, it’s a matching game. Your device needs to authenticate in a way that matches what your network is expecting. For example, if your device is trying to present a username and password to the network, but your network is looking for an identity certificate, authentication will fail.
As an admin, you’ll typically configure the details of your organization’s chosen flavor of Wi-Fi authentication on users’ devices using MDM. In a perfect world, you’ll send all the necessary profiles and payloads via MDM, and everything would just work. Unfortunately, things can and do fail, and it can be difficult to see where the problem lies.
When you do run into Wi-Fi issues, it’s useful to break down the components and eliminate the possible issues one at a time. Think of them as building blocks you are stacking together to build the desired outcome. Does the device trust the authentication server? Does the network trust the device or user? If yes, can the device connect to Wi-Fi?
But before you can dig into all that, there’s a chicken-and-egg problem to deal with: In order to deploy profiles and payloads from MDM, you need a network connection. Many companies use an open network or one that’s protected with a pre-shared key for this specific purpose. This onboarding network is like a walled garden: It’s configured so that nobody connecting to it can get at corporate data. They can only contact necessary services, such as MDM, the SCEP server, and the authentication server.
Check the Authentication Server
Remember the device needs to trust the authentication server. If your authentication server is not publicly trusted, you will use MDM to deploy just the certificates payload containing the server certificate.
Then you can try to join the network manually using the device. If the device trusts the authentication server, it will prompt for a username and password or identity certificate. If the device doesn't trust the authentication server, it's going to say, "Do you want to trust the server?" That would tell you that something is amiss with the server certificate(s). But remember: Don’t confuse the server certificate with the identity certificate.
Check the Device
Once you know your authentication server can be trusted and your server certificates are in place, it’s time to try to authenticate your user or device.
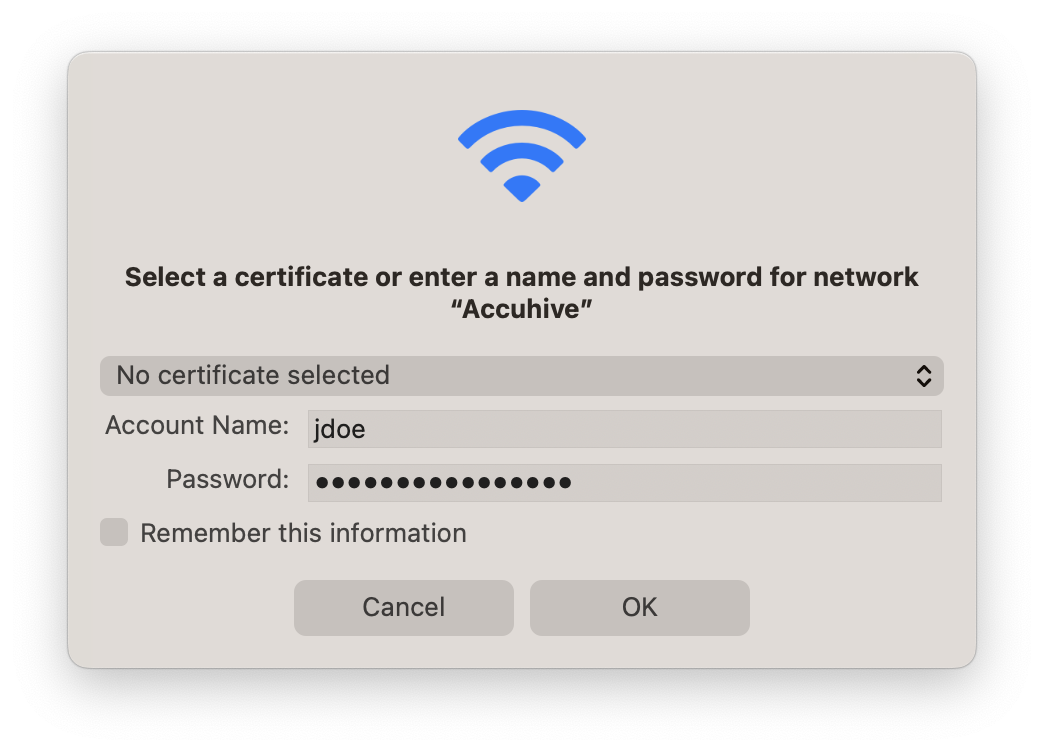
Try manually connecting to the network again using the device. If that network is using username-and-password authentication, enter those credentials when prompted. If they're correct, you should be allowed to join the network. There are a few other possible problems here, such as the network using a different authentication protocol than the one your device is trying to use, but this is a good starting point.
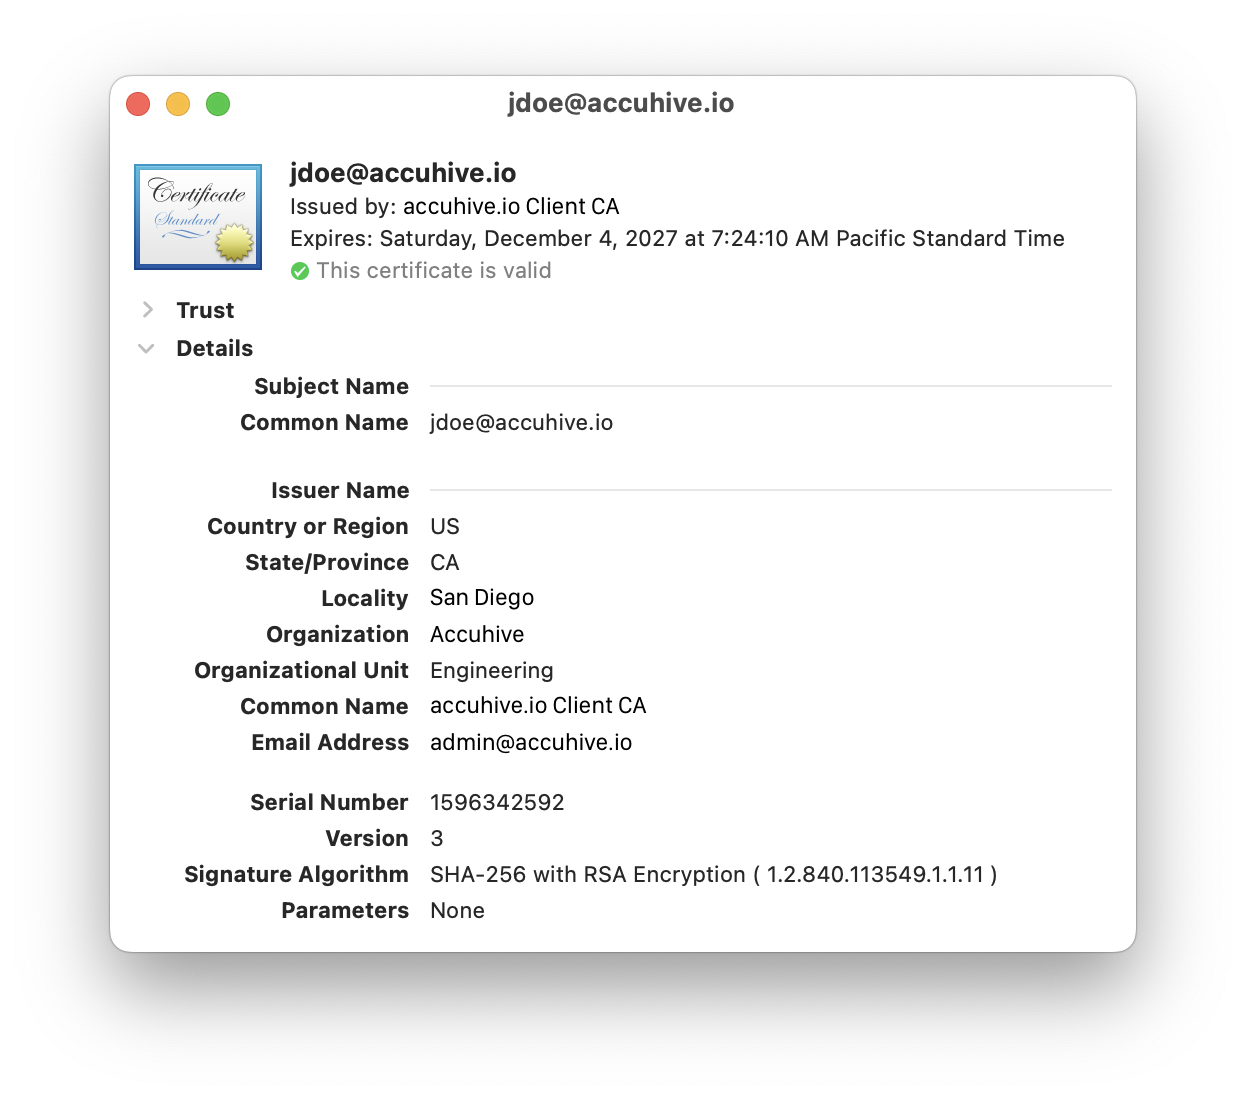
 If you are using identity certificates to authenticate to the network, it’s time to be sure the device is obtaining one. Use the SCEP payload or AD CS to obtain a unique identity certificate. If all goes as planned, you should end up with an identity certificate with the correct information stamped on it. To confirm that, check System Preferences (macOS 12 and earlier), System Settings (macOS 13), or the Settings app (iOS/iPadOS) to inspect the SCEP profile and ensure that it was installed.
In macOS, you can also look for the identity certificate in the macOS keychain. Inspect that certificate and installed profiles closely. If your authentication server is looking for an email address such as jdoe@accuhive.io and the certificate only has jdoe, it won’t work. It’s the equivalent of showing the traffic cop a license that has only your first time and no address.
Check the Wi-Fi Connection
Finally, if all that checks out, it’s time to examine the last building block: the Wi-Fi connection. Make sure the Wi-Fi payload is configured correctly: Does the network name match the SSID of your WI-Fi network? Does it correctly specify the authentication protocol—PEAP, TLS, or whatever you’re using? There are several such settings you may need to check. In all of this, it’s imperative that you work with your network administrator, who knows the network requirements best. Save time and don’t try to guess.
If things are still failing after you check all that, it’s time to head to the logs. Logs from the authentication server will show you if credentials are being rejected. Logs from the SCEP server show why an identity certificate might not be issued. Logs from the Wi-Fi network itself (such as a controller) will show that the device is using the wrong protocol. And of course, the device logs will show you what’s happening at the device level. The point is, you have good sources of information to help you, but you will want a network admin at your side to help you access and understand the information.
One last note: When working with your network admin to manipulate the network, don’t do anything that could disconnect existing users. The network is the lifeline for their devices and you don’t want to leave them stranded without a connection. Use a test network whenever possible. If you’re pushing out a new network configuration to your devices, it’s good practice to deploy the new one first before removing the old one so users are able to connect again without issue.
For more on configuring 802.1X authentication using Kandji, see our support article.
About Kandji
Kandji will help you manage your users' Wi-Fi connections, as well as more than 150 other settings, so you can achieve and automate the end-states you need. The Kandji team is constantly working on solutions to streamline your workflow and secure all of your Apple devices. With powerful and time-saving features such as zero-touch deployment, one-click compliance templates, and plenty more, Kandji has everything you need to bring your Apple fleet into the modern workplace.
