APIs and Apple Device Management: A Guide for Mac Admins
 Matt Wilson
Application programming interfaces—better known as APIs—make it possible for one service to talk to another without needing to know how the other one works. They create a common language that disparate services can use to communicate. As such, they’re the key to automating device management workflows. If you’re an Apple IT administrator, you’re using APIs all the time (even if you don’t know it), and so you need to know how they work. Here’s a high-level overview.
What Is an API?
In order to access a resource on a server, you need to make a request. APIs are how you do that. More specifically, an API acts as an intermediate layer between clients and servers and enables the former to access or retrieve resources from the latter.
In the same way that a web browser talks to a web server, we can use a script to talk to an API. Instead of requesting the code that makes up a website, an API request can go to a server and request information from a database.
While there are many flavors of APIs, the one most commonly used in the context of Apple device management is representational state transfer API—REST API for short. With a REST API, software, scripts, and services can reach out and communicate over standard HTTP protocols. Each API sets the rules that allow you to reach and communicate with its apps and resources. In REST, there are five types of requests—or methods—a client can send to a server:
GET: Obtain informationPOST: Add informationPUT: Replace informationPATCH: Update certain informationDELETE: Remove information
The GET request is a common one in device management because it allows you to retrieve data from API endpoints. It’s important to note that not all services support all methods; you have to check the documentation for a given service to find out what it supports.
API payloads are really just HTTP requests. They typically include the request method, location, how the content is to be sent or received, and an authorization method. We’ll walk through several examples in a minute.
The data exchanged via API is encrypted as long as the request is made using HTTPS. But the API itself must first allow access to its resources. For that, you need an API key. An API key is an encrypted string that identifies an application or resource. It’s used in conjunction with an API token to give access to the API.
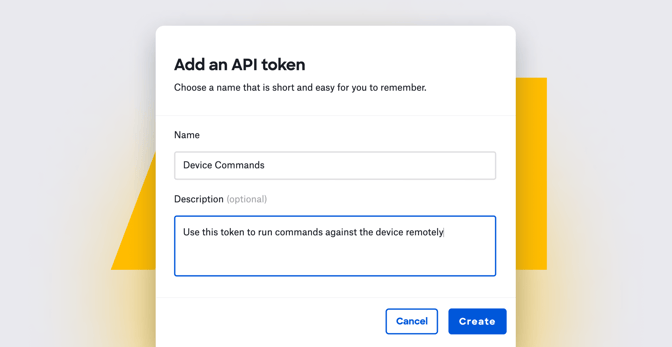
When you create such a token, you copy it to your clipboard. (Here's how to do that in Kandji.) It’s important to note that, once you have verified that you have the token and completed the creation process, you can’t view it again. So be sure to store the token in a safe place, such as a secure note in a password manager.
Each token has its own unique key and privileges on the endpoints to which you make requests. For example, in Kandji multiple tokens can be created, and these tokens can each be given varying levels of access to the API.
To ensure the quality of service for their API services, service administrators can set rate limits; such limits can help protect against distributed denial of service (DDoS) attacks, mitigate against excess bandwidth usage, and help control the consumption of resources used by a given application, tenant, or service.
Additionally, admins can define and enforce rate limits for specific API paths and operations; for example, you can allow unlimited GET requests while limiting PUT, PATCH, or DELETE operations. If a rate limit is reached, the API can reject, disable, load balance, or defer the operation until later.
Every time you send a request, you receive back a response code. This response indicates the status of the request. These response codes include:
200 OKThe request has succeeded.202 AcceptedThe request has been accepted for processing.204 No ContentThere is no value for that request.401 UnauthorizedYou provided incorrect or insufficient privileges.404 Not FoundYou can’t reach the URL or endpoint.429 Too Many RequestsYou've reached the rate limit set by the API.500 Internal Server ErrorThe server encountered an unexpected condition preventing it from fulfilling the request.
If things go according to plan, you'll then receive back a response code formatted in JSON, a human-readable data format made up of key-value pairs.
APIs and Device Management
As an admin, you can use APIs to extend the capabilities of a device management solution beyond what can be done in its user interface. APIs can be used to automate simple, repetitive tasks, such as requesting a list of all device records enrolled in a device management solution, returning the record for a specific device, or getting a list of installed applications found on a device.
APIs can also be used to connect two services together to create an integration. Such integrations allow the services to ‘talk’ to each other independently. For example, Kandji integrates with a number of solutions to ensure that devices managed by Kandji remain in compliance with security frameworks. Those solutions leverage the Kandji API to request information about devices and generate compliance reports.
But you can also use APIs directly from the command line to get information on your own. Here are some examples.
Returning a List of Devices
This example uses the curl command to send the GET request method to the devices API endpoint, instructing the API to return a list of enrolled devices. It uses a type of API token called a bearer token to authenticate the request.

More specifically:
curl: This command is built into macOS and can be used to programmatically get or update information from a URL.--request: This flag tellscurlto use a specific request method when communicating with a server at the URL.GET: This is one of the HTTP methods that can be used in acurlrequest. It tells the destination server that we want to get information.--url: This flag specifies the API URL—in this casehttps://example.clients.us-1.kandji.io/api/v1—and the specific endpoint (/devices) that thecurlcommand should target.--header ‘Authorization: [Bearer api_token_here]': The header flag lets us supply information that will be sent with the API request. In this example, that information is anAuthorizationheader containing a token type and the API token itself.
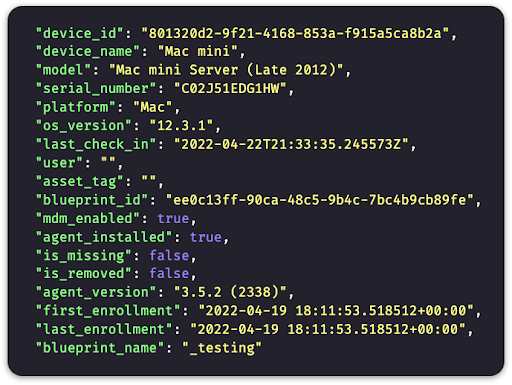
This request will return a JSON dictionary object containing keys and their values—in this case, specific pieces of information that describe the device. The command above will produce a response like this:
 In it, we can see some general information about enrolled devices, including the name (
device_name), the model (model), the serial number (serial_number), and the reported version of macOS (os_version) installed.
Getting a Specific Device Record using Parameters
What if you wanted to return a specific device record? You can do this by adding a parameter to the command we just used. Parameters can be used as search filters to narrow the results from a given API query.
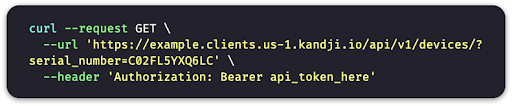
Here we’ve added the serial_number parameter to the --url flag. This tells the API to search for a device record that contains a serial number matching the one sent in the request.
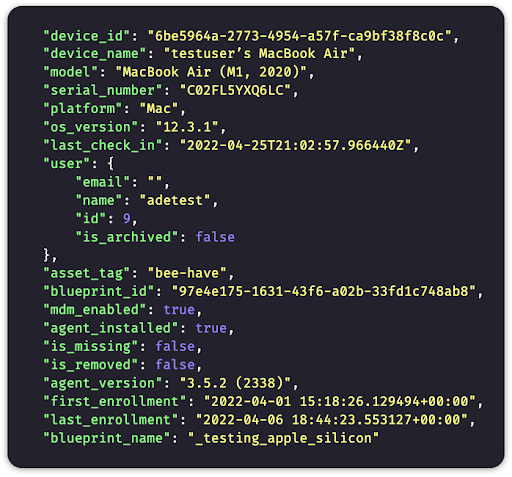
If there's a match, we will see only that device record in the response. If the device is not found, the response will be empty or include one of the error codes listed above. In addition to serial_number, there are other parameters that can be used in queries, and they can be combined to make the query even more specific.
Getting a List of Installed Apps on a Device
Now that we know how to return a device record from the API, we can use the device_id from the JSON response to return a list of apps installed on a specific device. The curl command will be similar to the one we've been looking at, but we will add a device_id and /apps to the end of the URL:

That command should return a JSON response containing a list of apps installed on the device. An app record in that list will look like this:
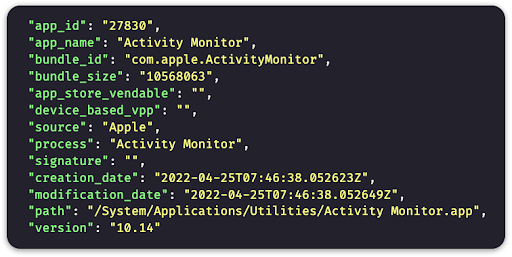
You'll see that the first app returned a bunch of details, including the app_name (Activity Monitor), the path where the app is installed, and much more.
That's just the first record returned by the API command; if you try that command yourself, using a device ID from your environment, you'll see a long, long list of every app installed on the device.
These are just a couple of examples to show you the kind of thing you can do with APIs in the context of device management. In a future article, we'll dive a little deeper into the topic, providing additional examples, to show you just how much APIs can help you as a Mac admin.
Editor's Note: This is the first in a series on what Apple admins need to know about APIs. Check out part 2 here.
About Kandji
Kandji fully supports APIs for managing and securing your Apple fleet. Documentation of that support can be found in the Kandji API support article. More specifics can be found at api.kandji.io and in our GitHub support repository. With support for APIs, as well as things like zero-touch deployment, one-click compliance, and offline remediation, Kandji is a great way to enroll, configure, and secure your devices.
